
How to Use Quickbooks Print Checks
Printing checks in QuickBooks can be a convenient way to pay your bills and track expenses. Here’s a step-by-step guide on how to use QuickBooks to print checks:
Note: The exact steps might vary slightly depending on the version of QuickBooks you are using, but the general process remains the same.
- Set Up Bank Account: Make sure you have your bank account set up in QuickBooks. If not, create a new account or ensure the existing one is set up correctly.
- Enter Transactions: Enter the expenses or bills that you want to pay via checks into QuickBooks. You can do this through the “Expenses” or “Bills” sections, depending on the version you’re using. Be sure to select the appropriate bank account.
- Check Printing Setup: Before you print checks, you need to set up your check printing preferences. To do this:
- Go to the “Banking” menu or “Expenses” menu, depending on the version.
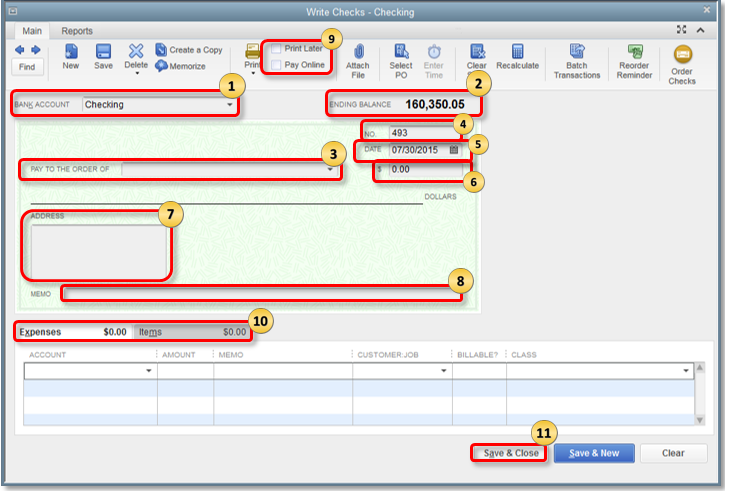
- Then, choose “Write Checks” or “Print Checks.”
- Verify the bank account, date, payee, and amount for the check.
- Click on the “Print Later” checkbox.
- Print Checks: Entered the transactions. Set up the checks to be printed later. You can follow these steps to print them:
- Go to the “File” menu and select “Print Forms,” then choose “Checks.”
- A list of checks that are ready to print will appear. Review the list to make sure everything is accurate.
- Then, select the checks you want to print, or you can choose to print all checks.
- Also, ensure your printer is properly connected and loaded with the appropriate check paper.
- Click the “Print” button to start printing the checks.
- Review and Record: After printing the checks, double-check that the printed information is accurate, including payee names, amounts, and account numbers.
- Record the Payment: Record the payment in QuickBooks to keep your books up to date. To do this:
- Go to the “Banking” or “Expenses” menu.
- Then, choose “Use Register” or “Register” to access the bank account register.
- Then, find the check you just printed and mark it as cleared.
- Reconcile Accounts: As part of your regular financial management, you should reconcile your bank accounts in QuickBooks to ensure that your records match your actual bank statements.
Source: https://chat.openai.com/


